This section deals with the problem of determining and listing the various tasks that must be accomplished in order to complete a project. The important matters of generating a project budget and developing a precise project schedule are left to succeeding chapters, though much of the raw material for doing those important things will come from the planning process described here.
1. The Launch Meeting—and Subsequent Meetings
Once senior management has decided to fund a major project, or a highly important small project, a project launch meeting should be called. Preparation for this meeting is required (Knutson, 1995; Martin and Tate, 1998).
When a PM is appointed to head a new project, the PM’s first job is to review the project objectives (project scope plus expected desirable outcomes that accrue to stakeholders from matters beyond the project’s deliverables) with the senior manager who has fundamental responsibility for the project. The purpose of this interview is threefold: (1) to make sure that the PM understands the expectations that the organization, the client, and other stakeholders have for the project; (2) to identify those among the senior managers (in addition to the manager who is party to this interview) who have a major interest in the project; and (3) to determine if anything about the project is atypical for projects of the same general kind (e.g., a product/service development project undertaken in order to extend the firm’s market into a new area).
Armed with this background, the PM should briefly study the project with an eye to preparing an invitation list for the project launch meeting. At the top of the list should be at least one representative of senior management, a strong preference given to the individual with the strongest interest in the project, the probable project champion. (The champion is usually, but not necessarily, the senior manager with responsibility for the project.) Recall in Chapter 2 we noted that the project champion could lend the political clout that is occasionally needed to overcome obstacles to cooperation from functional managers—if such obstacles were not amenable to dissolution by the PM.
Next on the invitation list come the managers from the functional areas that will be called upon to contribute competencies or capacities to the project or the project team members if they have already been selected. If highly specialized technical experts will be needed, the PM can add individuals with the required expertise to the list, after clearing the invitation with their immediate bosses, of course.
The PM may chair the launch meeting, but the senior manager introduces the project to the group, and discusses its contributions to the parent organization. If known and relevant, the project’s tentative priority may be announced, as should the tentative budget estimate used in the project selection process. If the due dates for deliverables have been contracted, this should also be made clear. The purpose of senior management’s presence is to ensure that the group understands the firm’s commitment to the project. It is particularly important for the functional managers to understand that management is making a real commitment, not merely paying lip service.
At this point, the PM can take over the meeting and begin a group discussion of the project. It is, however, important for the senior manager(s) to remain for this discussion. The continuing presence of these august persons more or less assures cooperation from the functional units. The purpose of the discussion is to develop a general understanding of what functional inputs the project will need.
Some launch meetings are restricted to brainstorming a problem. The output of such a meeting is shown in Table 3-1. In this case, the Director of Human Resources (HR) of a medium-size firm was asked by the CEO to set up a program to improve employee retention. At the time, the firm had a turnover rate slightly above 60 percent per year among its technical employees. (A turnover rate of 50 percent was about average for the industry.) The HR Director held a launch meeting of all department heads. At this meeting, the group developed a list of “action items,” each of which became a project.
When dealing with a single project, it is common for a preliminary plan to be generated at the launch meeting, but we question the advisability of this. For either functional managers or the PM to guess at budgets or schedules with no real study of the project’s deliverables is not prudent. First, the transition from a “tentative, wild guesstimate” made by senior managers or the EPMO to “but you promised” is instantaneous in these cases. Second, there is no foundation for mutual discussion or negotiation about different positions taken publicly and based on so little knowledge or thought. It is sufficient, in our judgment, to get a firm commitment from functional managers to study the proposed project and return for another meeting with a technically (and politically) feasible plan for their group’s input to the project.

It has been said, “If this means many planning meetings and extensive use of participatory decision making, then it is well worth the effort (Ford and McLaughlin, 1992, p. 316). If the emphasis is on “participative decision making,” we agree. Actual planning at the launch meeting should not go beyond the most aggregated level unless the deliverables are well understood or the delivery date is cast in concrete and the organization has considerable experience with similar projects. Of course, if this is the case, a major launch meeting may not be required.
The results of the launch meeting should be that: (1) the project’s scope is understood and temporarily fixed; (2) the various functional managers or team members understand their responsibilities and have committed to develop an initial task and resource plan; and (3) any potential benefits to the organization outside the scope of the project are noted. In the meetings that follow, the project plan will become more and more detailed and firmer. When the group has developed what appears to be a workable plan with a schedule and budget that seem feasible, the plan moves through the appropriate management levels where it is approved, or altered and approved. If altered, it must be checked with those who did the planning. The planners may accept the alterations or a counterproposal may be made. The project plan may cycle up and down the managerial ladder several times before it receives final approval, at which time no further changes may be made without a formal change order (a procedure also described in the plan).
Irrespective of who alters (or suggests alterations to) the project plan during the process described above, it is imperative that everyone be kept fully informed. It is no more equitable for a senior manager to change a plan without consultation with the PM (and, hence, the project team) than it would be for the PM or the team to alter the plan without consultation and approval from senior management. If an arm’s-length client is involved, the client’s approval is required for any changes that will have an effect on the schedule, cost, or deliverable. Clearly, the PMO (or EPMO) can facilitate this process.
A useful tool for facilitating the management of changes to a project’s scope is the Requirements Traceability Matrix. With this matrix, a table is created, which links the source of each project requirement to the project objectives, WBS deliverables, and so on intended to satisfy it. A variety of fields (columns) can be incorporated in the Requirements Traceability Matrix depending on the intended use of the matrix. A quick search of the Web will yield a variety of templates that are application-ready for use. An example is shown in PMBOK, 5th ed., Fig. 5-6 (p. 119).
Open, honest, and frequent communication between the interested parties is critical for successful planning. What emerges from this process is sometimes called the project baseline plan. It contains all the elements noted in Section 3.1 and all amendments to the plan adopted as the project is carried out.
2. Sorting Out the Project—The Work Breakdown Structure (WBS)
Inadequate up-front planning, especially failing to identify all important tasks, is a primary contributor to the failure of a project to achieve its cost and time objectives. Therefore, a primary purpose for developing a WBS is to ensure that any task required to produce a deliverable is not overlooked and thereby not accounted for and planned. PMBOK describes the construction of the WBS primarily in Chapter 5 on Scope, but it is also touched upon in Chapters 6 (Time), 7 (Cost), and 8 (Quality).
The previous subsection discussed the planning process as seen from the outside. The PM and the functional managers developed plans as if by magic. It is now time to be specific about how such plans may be generated. In order to develop a project plan that will take us from start to finish of a project, we need to know precisely what must be done, by whom, when, and with what resources. Every task, however small, that must be completed in order to complete the project should be listed together with any required material or human resources.
Making such a list is a nontrivial job. It requires a systematic procedure. While there are several systematic procedures that may be used, we advise a straightforward and conceptually simple way to attack the problem—the hierarchical planning process—which is how to build a Work Breakdown Structure (WBS) for the project.
To use this process, one must start with the project’s objective(s). The planner, often the PM, makes a list of the major activities that must be completed to achieve the objective(s). The list may be as short as two or three activities, or as large as 20. Usually the number is between 5 and 15. We call these Level 1 activities. The planner now takes each Level 1 activity and delegates it to an individual or functional group. (The PM might delegate one or more Level 1 tasks to him- or herself.) The delegatee deals with the task as if it is itself a project and makes a plan to accomplish it; that is, he or she lists a specific set of Level 2 tasks required to complete each Level 1 task. Again, the breakdown typically runs between 5 and 15 tasks, but a few more or less does not matter. The process continues. For each Level 2 task, someone or some group is delegated responsibility to prepare an action plan of Level 3 subtasks. The procedure of successively decomposing larger tasks into their component parts continues until the lowest level subtasks are sufficiently understood so that there is no reason to continue. As a rule of thumb, the lowest
level tasks in a typical project will have a duration of a few hours to a few days. If the team is quite familiar with the work, longer durations are acceptable for the lowest level tasks.
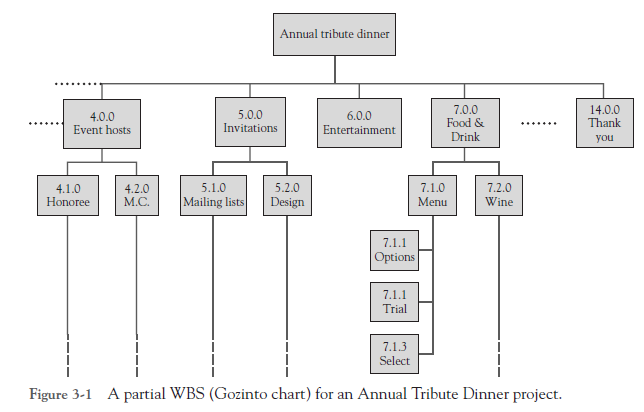
Another simple approach to creating the WBS begins by gathering the project team together and providing each member with a pad of sticky-notes. After defining the project’s objectives, and Level 1 tasks, team members then write on the sticky-notes all the tasks they can think of that are required to complete the project. The sticky-notes can then be placed on the wall and arranged in various ways. One advantage of this approach is that it provides the entire team with a better understanding of the work needed to complete the project. The fact that it is a cooperative exercise also helps the project team to bond. Finally, this exercise can generate a WBS tree. Figure 3-1 illustrates the tree. A colleague called this a “Gozinto chart.” (He said it was named after a famous Italian mathematician, Prof. Zepartzat Gozinto. The name has stuck.)
Microsoft Project (MSP) will make a WBS list (but not a tree-chart) at the touch of a key. The task levels are appropriately identified; for example, the WBS number “7.5.4” refers to the “Level 3, task Number 4” that is needed for “Level 2, task 5” that is a part of “Level 1, task 7.” (The PM has the option of using any other identification system desired, but must enter the identifiers manually.)
Task levels are appropriately organized on the MSP printout, with Level 1 tasks to the left and others indented by level. If one uses a tree diagram and each task is represented by a box with the WBS identifier number, one can add any information one wishes— given that it will fit in the box. Such an entry might be the proper account number to charge for work done on that task, or the name of the individual (or department) with task responsibility, or with a space for the responsible party’s signature denoting that the person has accepted accountability by “signing-off.” As we will see, additional information is often added by turning the “tree” into a list with columns for the additional data.
In doing hierarchical planning, only one rule appears to be mandatory. At any given level, the “generality” or “degree of detail” of the tasks should be roughly at the same level. One should not use highly detailed tasks for Level 1 plans, and one should not add very general tasks at Level 3 or more. This can best be done by finding all Level 2 subtasks for each Level 1 task before moving one’s attention to the Level 3 subtasks. Similarly, break all Level 2 tasks into their respective Level 3 tasks before considering any Level 4 subtasks, if the breakdown proceeds that far. A friend of ours who was an internationally known artist and teacher of industrial design explained why. When producing a painting or drawing, an artist first sketches-in the main compositional lines in the scene. The artist then adds detail, bit by bit, over the whole drawing, continuing this process until the work is completed. If this is done, the finished work will have “unity.” Unity is not achieved if individual areas of the picture are completed in detail before moving on to other areas. A young art student then made a pen-and-ink sketch of a fellow student, showing her progress at three different stages (see Figure 3-2).
We have said that the breakdown of Level 1 tasks should be delegated to someone who will carry out the Level 2 tasks. It is the same with Level 2 tasks being delegated to someone who will design and carry out the required Level 3 tasks. A relevant question is “Who are all these delegatees?” Let’s assume that the project in question is of reasonable size, neither very large nor small. Assume further that the PM and the functional managers are reasonably experienced in dealing with similar projects. In such a case, the PM would probably start by working on Level 1. Based on her background, the PM might work on Level 2 of one or more of the Level 1 tasks. Where recent experience was missing, she would delegate to the proper functional manager the task of specifying the Level 2 tasks. In the same way, the latter would delegate Level 3 task specification to the people who have the appropriate knowledge.
In general, the job of planning should be delegated to the lowest competent level. At Level 1, this is usually the PM. At lower levels, functional managers and specialists are the best planners. In Chapter 2 (Section 2.1) we described that strange bugbear, the micromanager. It is common for micromanagers to preempt the planning function from subordinates or, as an alternative, to allow the subordinate to develop an initial plan that the micromanager will amend with potentially disastrous results. The latter is an event reported with some frequency (and accuracy) in Dilbert©.

3. Extensions of the Everyday WBS
The WBS can be reshaped and buttressed with some additional data often not included in the project’s WBS. The WBS is generally oriented toward the project’s deliverables. The additions increase its orientation toward the planning and administration of the work. It does this by using available material, while adopting a format that is not typically used by the WBS. Figure 3-3 illustrates a layout that helps to organize the required information. We refer to these layouts as “modified” WBSs. The additional data in the columns are: (1) estimates of the resources required for each task in the plan, (2) the estimated time required to accomplish each task, (3) information about who has responsibility for the task, and (4) data that will allow tasks to be sequenced so that the set may be completed in the shortest possible time. Once the project starting date is known, item 2 in the preceding list may be changed from the time required for a subtask completion to the date on which the subtask is scheduled for completion.
To understand the importance of item 4 in the list, consider a set of subtasks, all of which must be completed to accomplish a parent task on a higher level. It is common in such a set that one or more subtasks (A) must be completed before one or more other subtasks (B) may be started. The former tasks (A) are said to be predecessors of the successor tasks (B). For instance, if our project is to paint the walls of a room, we know that before we apply paint to a wall, we must do a number of predecessor tasks. These predecessors include: clear the floor area near the wall to be painted and cover with drop cloths; remove pictures from the wall; clean loose dirt, oil, grease, stains, and the like from the wall; fill and smooth any cracks or holes in the wall; lightly sand or score the wall if it has previously been painted with a high-gloss paint; wipe with a damp cloth or sponge to remove dust from the sanding; and mask any surrounding areas where this paint is not wanted. All these tasks are predecessors to the task “Paint the walls.”

The predecessor tasks for “paint the walls” have been listed in the order in which they might be done if only one person was working. If several people are available, several of these tasks might be done at the same time. Note that if three tasks can be done simultaneously, the total elapsed time required is the time needed for the longest of the three, not the sum of the three task times. This notion is critical for scheduling, so predecessors must be listed in the WBS. One convention is important. When listing predecessors, only the immediate predecessors are listed. If A precedes B and B precedes C, only B is a predecessor of C.
The WBS not only identifies the deliverable, but also may note the start date if it is known or other information one wishes to show. Once the subtasks and their predecessors have been listed along with the estimated subtask activity times, the probable duration for the set of subtasks, and thus the task due date, can be determined as we will see in Chapter 5. If the estimates for the durations and resource requirements for accomplishing the subtasks are subject to constraints (e.g., no overtime work is allowed) or assumptions (e.g., there will be no work stoppage at our subcontractor’s plant), these should be noted in the WBS.
If one wishes, the information in the form shown in Figure 3-3 can be entered directly into Microsoft Project® (MSP). Alternatively, one can produce a WBS using MSP, directly, as shown in Figure 3-4. The project title can be entered in a header or footer to the form, as can other information such as a brief description of the deliverables, the name of the PM or the task manager, the project start and/or due dates, and the like.
Table 3-2 shows a WBS generated on MSP with task durations, and start and finish times for the Level 1 tasks in an infection control project. The project begins on September 12 and ends on November 30. As is customary, people work a five-day week so a three-week task has 15 work days and 21 calendar days (three weeks), assuming that the individual or team is working full-time on the task. As we will see in Chapter 5, one usually dares not make that assumption and should check carefully to determine whether or not it is a fact. If the one performing the task is working part-time, a task that requires 5 days of work, for example, may require several weeks of calendar time. We will revisit this problem in Chapter 5.
MSP makes the task of Level 1 planning of the broad project tasks quite straightforward. The same is true when the planners wish to generate a more detailed listing of all the steps involved in a project. The PM merely lists the overall tasks identified by the planning team as the activities required to produce the project deliverables—for example, the output of a brainstorming session. The PM and the planning team can then estimate task durations and use MSP to create a WBS. Table 3-3 shows a planning template used by a software company when they have their initial project brainstorming meetings about delivering on a customer request.
MSP has a planning wizard that guides the PM through the process of identifying all that is necessary to take an idea for a project activity and turn it into a useful WBS.
A computer systems support company repeatedly performed the same steps when clients would ask for a local area network (LAN) installation. They treated each job as if it were a new project, because costs and resource assignments varied with each assignment. To improve efficiency, they developed a planning template using MSP. After meeting with a client, the project manager could add the agreed-upon project start date, and any constraints on the schedule required by the client. The steps to install the LAN remained the same. The start and finish dates, and the number of resources needed to meet the schedule were adjusted for each individual client, but the adjustments were usually small. Once the schedule of a specific job was decided, the PM could determine the resources needed to meet that schedule and find the cost of the project.


If the PM wishes to include other information in the project’s modified WBS, there is no reason not to do so. Some include a column to list the status of resource or personnel availability. Others list task start dates.
The project launch meeting sets the project scope, elicits cooperation of others in the organization, demonstrates managerial commitment to the project, and initiates the project plan. The plan itself is generated through a hierarchical planning process by which parts of the plan are sequentially broken down into finer levels of detail by the individuals or groups that will implement them. The result is a WBS that lists all the tasks required to carry out the plan together with task resource requirements, durations, predecessors, and identification of the people responsible for each task.
Source: Meredith Jack R., Mantel Jr. Samuel J., Shafer Scott M., Sutton Margaret M. (2017), Project Management in Practice, John Wiley & Sons, Inc. 3th Edition.
I believe you have remarked some very interesting details, thanks for the post.