1. Data Creation in SPSS
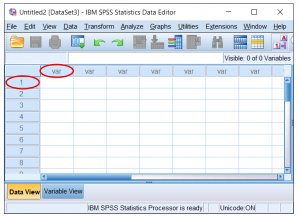
When you open the SPSS program, you will see a blank spreadsheet in Data View. If you already have another dataset open but want to create a new one, click File > New > Data to open a blank spreadsheet.
You will notice that each of the columns is labeled “var.” The column names will represent the variables that you enter in your dataset. You will also notice that each row is labeled with a number (“1,” “2,” and so on). The rows will represent cases that will be a part of your dataset. When you enter values for your data in the spreadsheet cells, each value will correspond to a specific variable (column) and a specific case (row).
Follow these steps to enter data:
- Click the Variable View tab. Type the name for your first variable under the Name column. You can also enter other information about the variable, such as the type (the default is “numeric”), width, decimals, label, etc. Type the name for each variable that you plan to include in your dataset. In this example, I will type “School_Class” since I plan to include a variable for the class level of each stude
- nt (i.e., 1 = first year, 2 = second year, 3 = third year, and 4 = fourth year). I will also specify 0 decimals since my variable values will only include whole numbers. (The default is two decimals.)

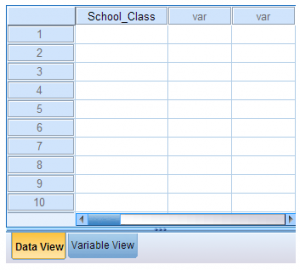
- Click the Data View tab. Any variable names that you entered in Variable View will now be included in the columns (one variable name per column). You can see that School_Class appears in the first column in this example.
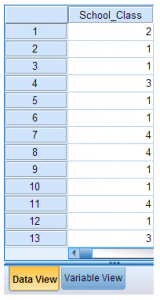
- Now you can enter values for each case. In this example, cases represent students. For each student, enter a value for their class level in the cell that corresponds to the appropriate row and column. For example, the first person’s information should appear in the first row, under the variable column School_Class. In this example, the first person’s class level is “2,” the second person’s is “1,” the third person’s is “1,” the fourth person’s is “3,” and so on.
- Repeat these steps for each variable that you will include in your dataset. Don’t forget to periodically save your progress as you enter data.

2. Inserting or Deleting Single Cases
Sometimes you may need to add new cases or delete existing cases from your dataset. For example, perhaps you notice that one observation in your data was accidentally left out of the dataset. In that situation, you would refer to the original data collection materials and enter the missing case into the dataset (as well as the associated values for each variable in the dataset). Alternatively, you may realize that you have accidentally entered the same case in your dataset more than once and need to remove the extra case.
2.1. Inserting a Case
To insert a new case into a dataset:
- In Data View, click a row number or individual cell below where you want your new row to be inserted.
- You can insert a case in several ways:
- Click Edit > Insert Cases;
- Right-click on a row and select Insert Cases from the menu; or
- Click the Insert Cases icon ().
- A new, blank row will appear above the row or cell you selected. Values for each existing variable in your dataset will be missing (indicated by either a “.” or a blank cell) for your newly created case since you have not yet entered this information.
- Type in the values for each variable in the new case.
2.2. Deleting a Case
To delete an existing case from a dataset:
- In the Data View tab, click the case number (row) that you wish to delete. This will highlight the row for the case you selected.
- Press on your keyboard, or right-click on the case number and select “Clear”. This will remove the entire row from the dataset.
3. Inserting or Deleting Single Variables
Sometimes you may need to add new variables or delete existing variables from your dataset. For example, perhaps you are in the process of creating a new dataset and you must add many new variables to your growing dataset. Alternatively, perhaps you decide that some variables are not very useful to your study and you decide to delete them from the dataset. Or, similarly, perhaps you are creating a smaller dataset from a very large dataset in order to make the dataset more manageable for a research project that will only use a subset of the existing variables in the larger dataset.
3.1. Inserting a Variable
To insert a new variable into a dataset:
- In the Data View window, click the name of the column to the right of of where you want your new variable to be inserted.
- You can now insert a variable in several ways:
- Click Edit > Insert Variable;
- Right-click an existing variable name and click Insert Variable; or
- Click the Insert Variable icon ().
A new, blank column will appear to the left of the column or cell you selected.
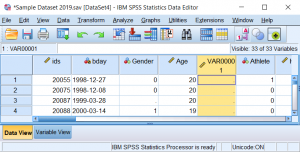
New variables will be given a generic name (e.g. VAR00001). You can enter a new name for the variable on the Variable View tab. You can quick-jump to the Variable View screen by double-clicking on the generic variable name at the top of the column. Once in the Variable View, under the column “Name,” type a new name for the variable name you wish to change. You should also define the variable’s other properties (type, label, values, etc.) at this time.
All values for the newly created variable will be missing (indicated by a “.” in each cell in Data View, by default) since you have not yet entered any values. You can enter values for the new variable by clicking the cells in the column and typing the values associated with each case (row).
Is it possible to insert a variable using syntax? Technically, there’s no direct syntax command to do so. Instead, you’ll need to use two syntax commands. You’ll first use the
COMPUTEcommand to initialize the new variable. You’ll then use theMATCH FILEScommand to actually re-order the variables. Suppose we want to insert a new column of blank values into the sample dataset after the first variable, ids. We can use this syntax to perform these tasks:/*Compute new variable containing blanks (system-missing values).*/ COMPUTE newvar=$SYSMIS. EXECUTE. /*Reorder the variables to place the new variable in the desired position.*/ MATCH FILES FILE = * /KEEP = ids newvar ALL.In the
MATCH FILEScommand,FILE=*says to act on the the current active dataset. The/KEEPstatement tells SPSS the specific order of the variables you want: we list the variables by name, in the order we want, separated by spaces, on the right side of the equals sign. TheALLoption at the end of the line says to retain all remaining variables in their current order. TheALLoption can only be used at the end of the line; the code will fail if you try to put it before other variable names. If we do not includeALL, SPSS will throw out any variables not named in the/KEEPstatement.
3.2. Deleting a Variable
To delete an existing variable from a dataset:
- In the Data View tab, click the column name (variable) that you wish to delete. This will highlight the variable column.
- Press Delete on your keyboard, or right-click on the selected variable and click “Clear.” The variable and associated values will be removed.
Alternatively, you can delete a variable through the Variable View window:
- Click on the row number corresponding to the variable you wish to delete. This will highlight the row.
- Press Delete on your keyboard, or right-click on the row number corresponding to the variable you wish to delete and click “Clear”.
You can also delete variables using command syntax.
/*Delete one variable.*/
DELETE VARIABLES var1.

/*Delete several variables.*/
DELETE VARIABLES var1 var2 var3.
4. ID Variables versus Row Numbers
Now that you know how to enter data, it is important to discuss a special type of variable called an ID variable. When data are collected, each piece of information is tied to a particular case. For example, perhaps you distributed a survey as part of your data collection, and each survey was labeled with a number (“1,” “2,” etc.). In this example, the survey numbers essentially represent ID numbers: numbers that help you identify which pieces of information go with which respondents in your sample. Without these ID numbers, you would have no way of tracking which information goes with which respondent, and it would be impossible to enter the data accurately into SPSS.
When you enter data into SPSS, you will need to make sure that you are entering values for each variable that correspond to the correct person or object in your sample. It might seem like a simple solution to use the conveniently labeled rows in SPSS as ID numbers; you could enter your first respondent’s information in the row that is already labeled “1,” the second respondent’s information in the row labeled “2,” etc. However, you should never rely on these pre-numbered rows for keeping track of the specific respondents in your sample. This is because the numbers for each row are visual guides only—they are not attached to specific lines of data, and thus cannot be used to identify specific cases in your data. If your data become rearranged (e.g., after sorting data), the row numbers will no longer be associated with the same case as when you first entered the data. Again, the row numbers in SPSS are not attached to specific lines of data and should not be used to identify certain cases. Instead, you should create a variable in your dataset that is used to identify each case—for example, a variable called StudentID.
Here is an example that illustrates why using the row numbers in SPSS as case identifiers is flawed:
Let’s say that you have entered values for each person for the School_Class variable. You relied on the row numbers in SPSS to correspond to your survey ID numbers. Thus, for survey #1, you entered the first respondent’s information in row 1, for survey #2 you entered the second person’s information in row 2, and so on. Now you have entered all of your data.
But suppose the data get rearranged in the spreadsheet view. A common way of rearranging data is by sorting—and you may very well need to do this as you explore and analyze your data. Sorting will rearrange the rows of data so that the values appear in ascending or descending order. If you right-click on any variable name, you can select “Sort Ascending” or “Sort Descending.” In the example below, the data are sorted in ascending order on the values for the variable School_Class.

But what happens if you need to view a specific respondent’s information? Or perhaps you need to double-check your entry of the data by comparing the original survey to the values you entered in SPSS. Now that the data have been rearranged, there is no way to identify which row corresponds to which participant/survey number.
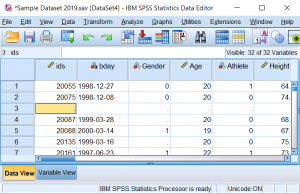
The main point is that you should not rely on the row numbers in SPSS since they are merely visual guides and not part of your data. Instead, you should create a specific variable that will serve as an ID for each case so that you can always identify certain cases in your data, no matter how much you rearrange the data. In the sample data file, the variable ids acts as the ID variable.
If you do not have an ID variable in your dataset, a convenient way to generate one is to use the system variable $CASENUM. You can use the Compute Variables procedure (simply enter $CASENUM in the Numeric Expression box), or by running the following syntax after all of your data has been entered:
COMPUTE id=$CASENUM.
EXECUTE.
20 Sep 2022
31 Mar 2023
22 Sep 2022
17 Sep 2022
28 Mar 2023
27 Mar 2023