1. The Do-file Editor
Stata comes with an integrated text editor called the Do-file Editor, which can be used for many tasks. It gets its name from the term do-file, which is a file containing a list of commands for Stata to run (called a batch file or a script in other settings). See [U] 16 Do-files for more information. Although the Do-file Editor has advanced features that can help in writing such files, it can also be used to build up a series of commands that can then be submitted to Stata all at once. This feature can be handy when writing a loop to process multiple variables in a similar fashion or when doing complex, repetitive tasks interactively.
To get the most from this chapter, you should work through it at your computer. Start by opening
the Do-file Editor, either by clicking on the Do-file Editor button, ![]() , or by typing doedit in the Command window and pressing Enter.
, or by typing doedit in the Command window and pressing Enter.
2. The Do-file Editor toolbar
The Do-file Editor has 15 buttons. Many of the buttons share a similar purpose with their look-alikes in the main Stata toolbar.
![]()
If you ever forget what a button does, hover the mouse pointer over a button, and a tooltip will appear.
New: Open a new do-file in a new tab in the Do-file Editor.
Open: Open a do-file from disk in a new tab in the Do-file Editor. Save: Save the current file to disk.
Print: Print the contents of the Do-file Editor.
Find: Open the Find dialog for finding text.
Cut: Cut the selected text and put it in the Clipboard.
Copy: Copy the selected text to the Clipboard.
Paste: Paste the text from the Clipboard into the current document.
Undo: Undo the last change.
Redo: Undo the last undo.
Toggle bookmark: Turn on or off the bookmark on the current line. Bookmarks are a U: way to move quickly within the do-file. They are quite useful in long do-files or when debugging.
Previous bookmark: Go to the previous bookmark (if any).
Next bookmark: Go to the next bookmark (if any).
Show file in Viewer: Show the contents of the do-file in a Viewer window. This is worthwhile when editing files that contain SMCL tags, such as log files or help files.
Execute (do): Run the commands in the do-file, showing all commands and their output. ► If text is highlighted, the button becomes the Execute selection (do) button and will run only the selected lines, showing all output. We will refer to this as the Do button.
3. Using the Do-file Editor
Suppose that we would like to analyze fuel usage for 1978 automobiles in a manner similar to what we did in [GSW] 1 Introducing Stata—sample session. We know that we will be issuing many commands to Stata during our analysis and that we want to be able to reproduce our work later without having to type each command again.
We can do this easily in Stata: simply save a text file containing the commands. When that is done, we can tell Stata to run the file and execute each command in sequence. Such a file is known as a Stata do-file; see [U] 16 Do-files.
To analyze fuel usage of 1978 automobiles, we would like to create a new variable containing gallons per mile. We would like to see how that variable changes in relation to vehicle weight for both domestic and imported cars. Performing a regression with our new variable would be a good first step.
To get started, click on the Do-file Editor button to open the Do-file Editor. After the Do-file Editor opens, type the commands below into the Do-file Editor. Purposely misspell the name of the foreign variable on the fifth line. (We are intentionally making some common mistakes and then pointing you to the solutions. This will save you time later.)
* an example do-file sysuse auto
generate gp100m = 100/mpg
label var gp100m “Gallons per 100 miles”
regress gp100m weight foreing
Here is what your Do-file Editor should look like now:
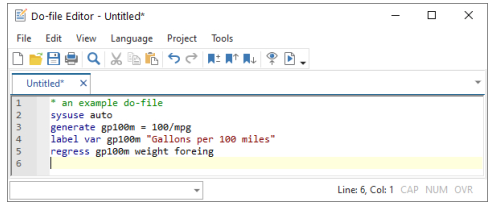
You will notice that the color of the text changes as you type. The different colors are examples of the Do-file Editor’s syntax highlighting. The colors and text properties of the syntax elements can be changed by selecting Edit > Preferences… from the Do-file Editor menu bar and then clicking on the Colors tab in the resulting window.
Syntax highlighting extends beyond highlighting Stata commands. You can switch the syntax highlighting from Stata by going to the Language menu and choosing the language you would like. The Language menu includes a selection for Markdown because Stata can process Markdown to create dynamic documents. See [RPT] dyndoc for more information. This menu also contains selections for Python and Java because Stata has both Python integration and Java integration. See [P] PyStata integration and [P] Java integration for more information. Stata will default to the proper language based on the extension of the file you are editing, but if the file has not been saved yet, you will need to tell it what language to choose.
Also note that if you pause briefly as you type, the Do-file Editor will allow autocompletion of words that are already in the do-file. Once the suggestions appear, more typing will narrow down the possibilities. You can navigate the suggestions using the up- and down-arrow keys or keep typing to narrow them to a single word. Once you have the word you like, pressing Enter will place the word in your do-file.
Click on the Do button, ![]() , to execute the commands. Stata executes the commands in sequence, and the results appear in the Results window:
, to execute the commands. Stata executes the commands in sequence, and the results appear in the Results window:
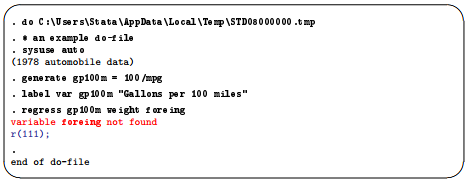
The do “C:\ …” command is how Stata executes the commands in the Do-file Editor. Stata saves the commands from a do-file with unsaved changes to a temporary file and issues the do command to execute them. Everything worked as planned until Stata saw the misspelled variable. The first three commands were executed, but an error was produced on the fourth. Stata does not know of a variable named foreing. We need to go back to the Do-file Editor and change the misspelled variable name to foreign in the last line:
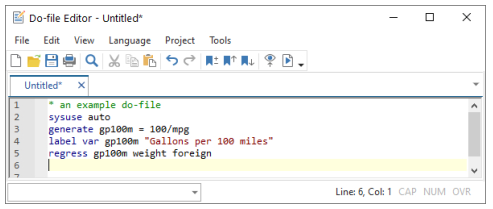
Click on the Do button again. Alas, Stata now fails on the first line—it will not overwrite the dataset in memory that we changed.
We now have a choice for what we should do:
- We can put a clear command in our do-file as the very first command. This automatically clears out Stata’s memory before the do-file tries to load auto.dta. This is convenient but dangerous because it defeats Stata’s protection against throwing away changes without warning.
- We can type a clear command in the Command window to manually clear the dataset and then process the do-file again. This process can be aggravating when building a complicated do-file.
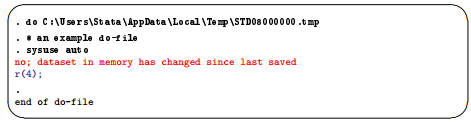
Here is some advice: Automatically clear Stata’s memory while debugging the do-file. Once the do-file is in its final form, decide the context in which it will be used. If it will be used in a highly automated environment (such as when certifying), the do-file should still automatically clear Stata’s memory. If it will be used rarely, do not clear Stata’s memory. This decision will save much heartache. We will add a clear option to the sysuse command to automatically clear the dataset in Stata’s memory before the do-file runs:

The do-file now runs well, as clicking on the Do button shows:

You might want to select File > Save as… to save this do-file from the Do-file Editor. Later, you could select File > Open to open it and then add more commands as you move forward with your analysis. By saving the commands of your analysis in a do-file as you go, you do not have to worry about retyping them with each new Stata session. Think hard about removing the clear option from the first command.
After you have saved your do-file, you can execute the commands it contains by typing do filename, where the filename is the name of your do-file.
4. The File menu
The File menu of the Do-file Editor includes standard features found in most text editors. You may choose any of these menu items: create a New > Do-file, Open an existing file, Save the current file, save the current file under a new name with Save as…, or Print the current file. There are also buttons on the Do-file Editor’s toolbar that correspond to these features.
Finally, you can create a New > Project… to keep track of collections of files used in a project. These can be do-files, data files, graph files, or any other files you like. For more information on the Project Manager, see [P] Project Manager.
5. The Edit menu
The Edit menu of the Do-file Editor includes the standard Undo, Redo, Cut, Copy, Paste, Delete, and Find capabilities. There are also buttons on the Do-file Editor’s toolbar for easy access to these capabilities. There are several other Edit menu features that you might find useful:
- You can select Insert file… to insert the contents of another file at the current cursor position in the Do-file Editor.
- You can select the current line with Select line.
- You can delete the current line with Delete line.
- Find > Go to line… will allow you to jump to a specific line number. The line numbers are displayed at the left and the lower-right of the Do-file Editor window.
- Advanced leads to a submenu with some programmer’s friends:
- Shift right indents the selection by one tab.
- Shift left unindents the selection by one tab.
- Re-indent indents the selection according to its nesting within blocks and programs.
- Toggle comment toggles //-style comments at the start of the selected lines.
- Add block comment puts a /* before and a */ after the selected region, commenting it out.
- Remove block comment undoes the above.
- Make selection uppercase converts the selection to all capital letters.
- Make selection lowercase converts the selection to all lowercase letters.
- Complete word attempts to complete the current word based on words that are already in the do-file. If there are multiple possibilities, all will be shown. You can either pick the completion you would like or keep typing to narrow the choices.
- Convert to UTF-8… converts the current file to UTF-8
- Convert line endings to macOS/Unix format (\n) converts the line endings for the current file to macOS/Unix format.
- Convert line endings to Windows format (\r\n) converts the line endings for the current file to Windows format.
- Convert tabs to spaces replaces any tab characters with spaces, leaving the spacing as it currently appears.
- Convert leading spaces to tabs converts any spaces at the start of lines to tab characters. The number of spaces per tab is determined by a preference setting.
- Convert all spaces to tabs converts spaces to tab characters wherever possible. The number of spaces per tab is determined by a preference setting.
Matching and balancing of parentheses ( ), braces { }, and brackets [ ] are also available from the Edit menu. When you select Edit > Find > Match brace, the Do-file Editor looks at the character immediately to the left and right of the cursor. If either is one of the characters that the editor can match, the editor will find the matching character and place the cursor immediately in front of it. If there is no match, the cursor will not move.
When you select Edit > Find > Balance braces, the Do-file Editor looks to the left and right of the current cursor position or selection and creates a selection that includes the narrowest level of matching braces. If you select Balance braces again, the editor will expand the selection to include the next level of matching braces. If there is no match, the cursor will not move. Balancing braces is useful for working with blocks of code defined by loops or if commands. See [P] foreach, [P] forvalues, [P] while, and [P] if for more information.
Balance braces is easier to explain with an example. Type {now {is the} time} in the Do-file Editor. Place the cursor between the words is and the. Select Edit > Find > Balance braces. The Do-file Editor will select {is the}. If you select Balance braces again, the Do-file Editor will select {now {is the} time}.
Text in Stata strings can include Unicode characters and is encoded as UTF-8 (see [U] 12.4.2 Handling Unicode strings). However, you may have do-files, ado-files, or other text files that you used with Stata 13 or earlier, and those files contain characters other than plain ASCII such as accented characters, Chinese, Japanese, or Korean (CJK) characters, Cyrillic characters, and the like. If you open a file that is not encoded in UTF-8, Stata prompts you to specify the encoding for the file so that it can convert the file to UTF-8. If you cancel the conversion or choose the wrong encoding, you can try the conversion again later using Convert to UTF-8. The conversion to UTF-8 can be undone by using Edit > Undo and is not permanent until you save the do-file. For Stata datasets with characters not encoded in UTF-8 or for bulk conversion of multiple Stata files, you should use the Unicode translate command.
Editing tip: You can click on the left margin near a line number to select the entire line and the end-of-line characters. Doing so makes it easy to delete lines or cut lines and paste them elsewhere. You can click and drag within the line-number column to select a range of complete lines.
6. The View menu
The View menu of the Do-File Editor allows you to zoom in and out or display special characters such as tabs and line endings.
7. The Tools menu
You have already learned about the Do button. Selecting Tools > Execute (do) is equivalent to clicking on the Execute (do) button.
Selecting Tools > Execute (do) from top will send all the commands from the first line to the current line to the Command window. This method is a quick way to run a part of a do-file.
Selecting Tools > Execute (do) to bottom will send all the commands from the current line through the end of the contents of the Do-file Editor to the Command window. This method is a quick way to run a part of a do-file.
Selecting Tools > Execute quietly (run) is equivalent to Tools > Execute (do) but the commands will be executed qUietly; that is, no output will be displayed in the Command window.
Selecting Tools > Execute (include) is similar to clicking on the Execute (do) button with one major difference: local macros defined in the current session can be expanded in the commands being executed.
Do is equivalent to Stata’s do command, whereas Execute (include) is equivalent to Stata’s include command. See [U] 16 Do-files for a complete discussion.
You can also preview files in the Viewer by selecting Tools > Show file in Viewer or by clicking on the Show file in Viewer button, ? . This feature is useful when working with files that use Stata’s SMCL tags, such as when writing help files or editing log files.
8. Saving interactive commands from Stata as a do-file
While working interactively with Stata, you might decide that you would like to rerun the last several commands that you typed interactively. From the History window, you can send highlighted commands or even the entire contents to the Do-file Editor. You can also save commands as a do-file and open that file in the Do-file Editor. You can copy a command from a dialog (rather than submit it) and paste it into the Do-file Editor. See [GSW] 6 Using the Data Editor for details. Also see [R] log for information on the cmdlog command, which allows you to log all commands that you type in Stata to a do-file.
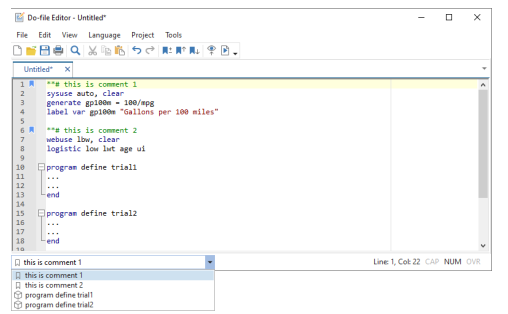
9. Navigating your do-file
When working with long files, bookmarks allow you to easily navigate through your do-file. By placing a bookmark before important sections in your do-file, you can return to those sections more easily later. You can add a bookmark line by using Edit > Toggle bookmark, clicking the Toggle bookmark button on the toolbar, or by manually typing a line beginning with a special comment, **#. All other text on the rest of the line is treated as the title of the bookmark. You cannot have ado code on the same line as the bookmark comment, or the bookmark comment will be ignored.
You can move between bookmarks using the options in the Edit menu, the equivalent buttons on the Do-file Editor toolbar, or the Navigation Control. The Navigation Control of the Do-file Editor allows you to move between bookmarks as well as programs that you have defined in your do-file. When you select a program or a bookmark from the Navigation Control, you will jump directly to the position of that program or bookmark in your do-file.
Bookmarks can also be removed with the Toggle bookmark option in the Edit menu or toolbar as well as simply deleting the line. You can also add and remove bookmarks by clicking in the bookmark margin next to the line you want to add the bookmark before. When you add a bookmark line, the bookmark icon will be added in the bookmark margin to make it more visibly obvious for you while scrolling.
10. Projects
For advanced users managing many files as part of a project, Stata has a Project Manager that uses the Do-file Editor. For more information on the Project Manager, see [P] Project Manager.
Source: STATA (2021), Getting Started with Stata for Windows, Stata Press Publication.
23 Sep 2022
29 Sep 2022
28 Sep 2022
3 Oct 2022
3 Oct 2022
1 Oct 2022