1. The Variables Manager
This chapter discusses Stata’s Variables Manager. To get started, open the automobile dataset by typing sysuse auto, clear in the Command window. You open the Variables Manager by selecting Data > Variables Manager or clicking on the Variables Manager button ![]() .
.
The Variables Manager is a tool for managing properties of variables both individually and in groups. It can be used to create variable and value labels, rename variables, change display formats, and manage notes. It has the ability to filter and group variables as well as to create variable lists. Users will find these features useful for managing large datasets.
Any action you take in the Variables Manager results in a command being issued to Stata as though you had typed it in the Command window. This means that you can keep good records and learn commands by using the Variables Manager.
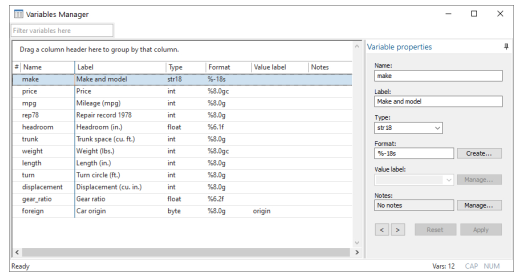
2. The Variable pane
The left pane of the Variables Manager is called the Variable pane, though it has no explicit title on the screen. It shows the list of variables in the dataset. This list can be manipulated in a variety of ways.
- The variables can be filtered by entering text into the filter box in the upper-left corner. This can be a good way to zoom in on similarly named or labeled variables.
- The list can be sorted by clicking on the column title.
-
- If you click on a column title, it will sort in ascending order.
- A second click on the same column title will change to sorting in descending order.
- Clicking on the hash mark (#) restores the sort order to the original variable order.
The sort order affects only how the data appear in the Variable Managers window—the dataset itself stays the same.
- The order of the columns can be changed by dragging the column titles. To restore the original column headings, right-click on the column titles and select Restore column defaults.
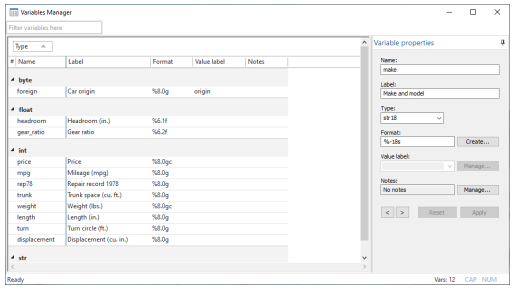
- The variables can be grouped by values in one or more columns. This is done by dragging the column titles into the grouping bar. The grouping can be canceled by dragging the column titles back into the column titles row. Here is an example of auto.dta grouped by variable type:
3. Right-clicking on the Variable pane
Right-clicking on the Variable pane displays a menu from which you can do many common tasks:
- Edit variable properties to change the focus to the Variable Properties pane. This will expose the Variable Properties pane if it has been automatically hidden.
- Keep only selected variables to keep only the selected variables in the dataset and to drop all the others.
- Drop selected variables to drop all the selected variables from the dataset.
- Manage notes for selected variable… to open a window that allows adding and deleting notes for a single variable. This is disabled if multiple variables are selected.
- Manage notes for dataset… to open a window that allows adding and deleting notes for the dataset as a whole.
- Copy varlist to copy the names of the selected variables to the Clipboard.
- Select all to select all visible variables. If a variable has become hidden because of the filter, it will not be selected.
- Send varlist to Command window to insert the names of the selected variables in the Command window. Combined with grouping and sorting, this can be a useful way to create variable lists in large datasets.
- Print.. to print the Variable pane. You can change the widths of the printed columns by changing the widths of the columns in the Variables Manager.
4. The Variable properties pane
The Variable Properties pane can be used to manipulate the properties of variables selected in the Variable pane. With one variable selected, you can manipulate all properties of the variable. With many variables selected, you can change their formats or types as well as assign value labels all at once. These fields work in the same fashion as those shown in Renaming and formatting variables in [GSW] 6 Using the Data Editor. We can also manage the notes Stata allows you to attach to variables and the dataset—we will show an example below.
The Variable Properties pane is, in actuality, a docking window, like those discussed in Auto Hide and pinning in [GSW] 2 The Stata user interface. You can see this because of the pushpin in its upper-right corner. If you click on the pushpin, the window will automatically hide when not in use. You can also dock the window in another part of the Variables Manager window by dragging it by its title bar to one of the docking guides.
5. Managing notes
Stata allows you to attach notes to both variables and the dataset as a whole. These are simple text notes that you can use to document whatever you like—the source of the dataset, data collection quirks associated with a variable, what you need to investigate about a variable, or anything else.
Start by selecting a variable in the Variable pane. We will work with the price variable. Click on the Manage… button next to the Notes field, and you will see the following dialog appear:
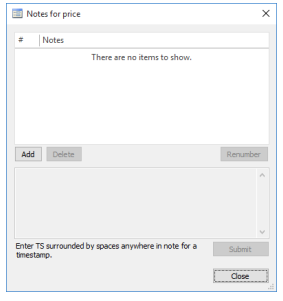
We will add a few notes:
- Click on the Add button to add a note.
- Type TS – started working. TS with a trailing space inserts a timestamp in the note.
- Add two more notes. We added two notes about prices:
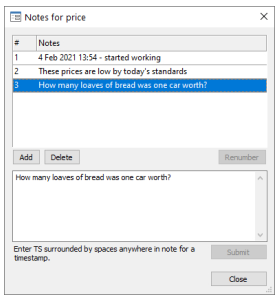
It is worth experimenting with adding, deleting, and editing notes. Notes can be an invaluable memory aid when working on projects that last a long time. Anytime you manipulate notes in the Notes Manager, you create Stata commands.
Source: STATA (2021), Getting Started with Stata for Windows, Stata Press Publication.
Hello.This post was extremely fascinating, particularly since I was searching for thoughts on this topic last Saturday.