Stata’s capabilities include data management, statistical analysis, graphics, simulations, regression, and custom programming. It also has a system to disseminate user-written programs that lets it grow continuously. This article introduces the core of Stata’s interface: its main windows, its toolbar, its menus, and its dialogs.
1. The windows
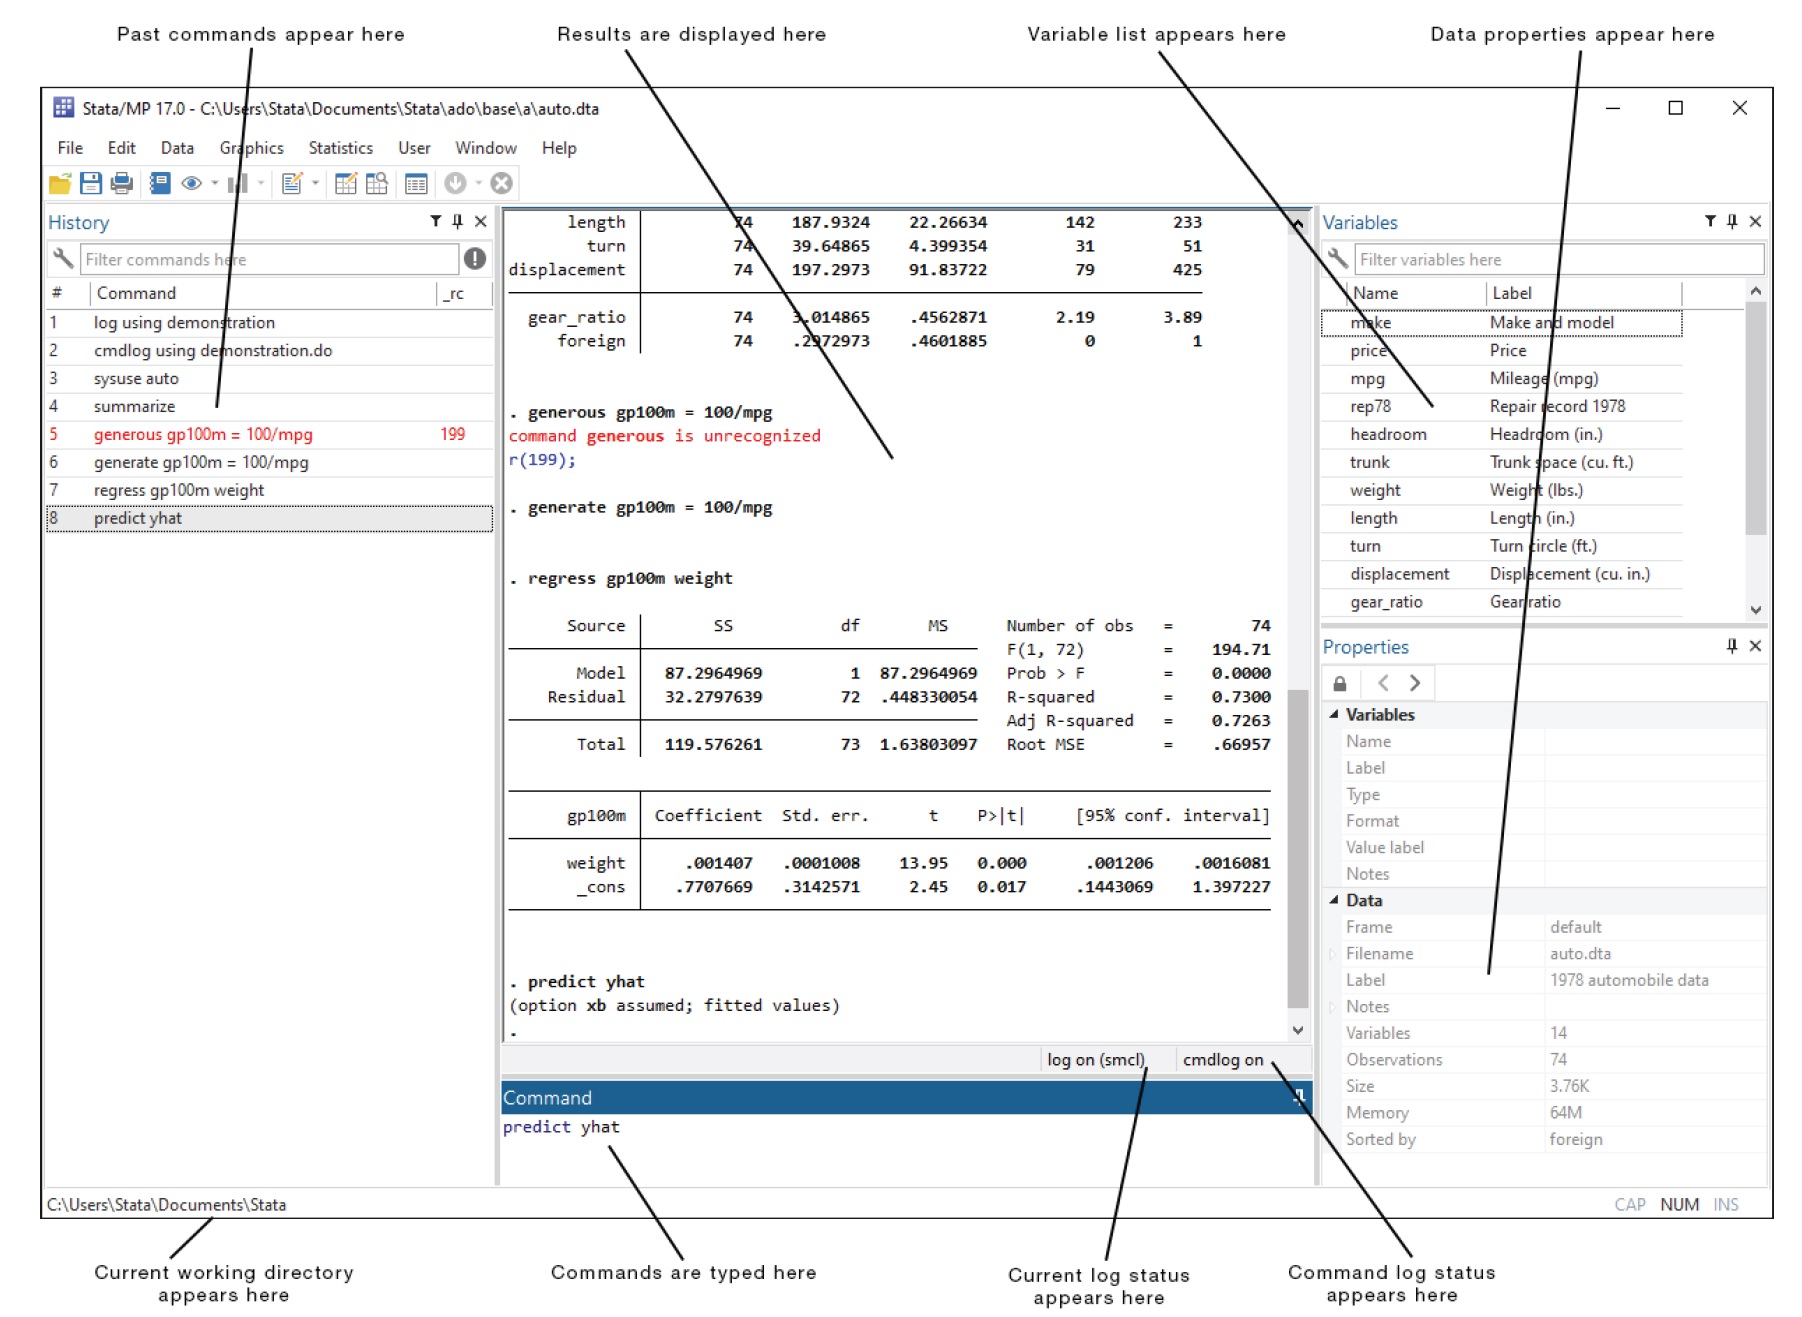
The five main windows are the History, Results, Command, Variables, and Properties windows. Except for the Results window, each window has its name in its title bar. These five windows are typically in use the whole time Stata is open. There are other, more specialized windows such as the Viewer, Data Editor, Variables Manager, Do-file Editor, Graph, and Graph Editor windows – these are discussed later in this manual.
The Command window
Commands are submitted to Stata from the Command window. The Command window supports basic text editing, copying and pasting, a command history, function-key mapping, filename completion, and variable-name completion.
From the Command window, pressing:
Page Up steps backward through the command history.
Page Down steps forward through the command history.
Tab autocompletes a partially typed variable name when possible or presents a list of similar names if there could be more than one completion. Further typing will narrow the list. As soon as the name is complete, the full name will be inserted. If the name starts with a double quote, Tab attempts to autocomplete a filename in the same manner.
The command history allows you to recall a previously submitted command, edit it if you wish, and then resubmit it. Commands submitted by Stata’s dialogs are also included in the command history, so you can recall and submit a command without having to open the dialog again.
The Results window
The Results window contains all the commands and their textual results you have entered during the Stata session.
You can scroll through the Results window to look at work you have done, it is much simpler to search within the Results window by using the find bar. By default, the find bar is hidden. You can expose it by selecting Edit > Find ….
You can clear out the Results window at any time by right-clicking in the Results window and selecting Clear results from the contextual menu. This action is not undoable.
The Variables window
The Variables window shows the list of variables in the dataset, along with the properties of the variables. By default, it shows all the variables and their variable labels. You can change what properties get displayed by right-clicking on the header of any column of the Variables window.
Click once on a variable in the Variables window to select it. Multiple variables can be selected in the usual fashion, either by Ctrl-clicking on nonadjacent variables or by clicking on a variable and Shift-clicking on a second variable to select all intervening variables.
Double-clicking on a variable in the Variables window puts the selected variable at the insertion point in the Command window.
The leftmost column of the Variables window is called the one-click paste column. You can also send variables to the Command window by hovering the mouse over the one-click paste column of the Variables window and clicking on the arrow that appears. The one-click paste column can be shown or hidden in the same fashion as the other columns in the Variables window.
The Variables window supports filtering and changing the display order of the variables. Text entered in the Filter variables here field will filter the variables appearing in the Variables window. The filter is applied to all visible columns and shows all variables that match the criteria in at least one column. By default, the filter will ignore case and show any variables for which at least one column contains any of the words in the filter. Clicking on the wrench on the left will allow you to change this behavior as well as add or remove additional columns containing information about the variables.
You can change the display order of the variables in the Variables window by clicking on any column header. The first click sorts in ascending order, the second click sorts in descending order, and the third click puts the variables back in dataset order. Thus, clicking on the Name column header will make the Variables window display the variables in alphabetical order. Sorting in the Variables window is live, so if you change a property of a variable when the Variables window is sorted by that property, it will automatically move the variable to its proper location. Reordering the display order of the variables in the Variables window does not affect the order of the variables in the dataset itself.
Right-clicking on a variable in the Variables window displays a menu from which you can select
- Keep only selected variables to keep just the selected variables in the dataset in memory. You will be asked for confirmation. This affects only the dataset in memory, not the dataset as saved on your disk.
- Drop selected variables to drop, or eliminate, the selected variables from the dataset in memory. You will be asked for confirmation. Just as above, this affects only the dataset in memory, not the dataset as saved on your disk.
- Copy varlist to copy the selected variable names to the clipboard.
- Select all to select all variables in the dataset that satisfy the filter conditions. If no filter has been specified, all variables will be selected.
- Send varlist to Command window to send all selected variables to the Command window.
- .. to bring up a Font dialog, allowing you to change the font used to display the Variables window contents.
Items from the contextual menu issue standard Stata commands, so working by right-clicking is just like working directly in the Command window.
If you would like to hide the Variables window, click on its close button.
To reveal a hidden Variables window, select Window > Variables.
The Properties window
The Properties window displays variable and dataset properties. If a single variable is selected in the Variables window, its properties are displayed. If there are multiple variables selected in the Variables window, the Properties window will display properties that are common across all selected variables.
Clicking the lock icon in the Properties window title bar toggles the ability to alter properties of the selected variables. By default, changes are not allowed. Once the properties are unlocked, you can make any changes to variable or dataset properties you like. Each change you make will create a command that appears in the Results and Command windows, as well as in any command log, so the changes are reproducible. Using the Properties window is one of the simplest ways of managing notes, changing variable and value labels, and changing display formats.
Clicking the arrow buttons next to the lock icon will select the previous or next variable shown in the Variables window, and that selection will be reflected in the Properties window. If you would like to hide the Properties window, click on its close box. If you would like to reveal a hidden Properties window, select Window > Properties.
You should also investigate the Variables Manager, because it extends these capabilities and provides a good interface for managing variables.
The History window
The History window shows the history of commands that have been entered, with unsuccessful commands and their error codes in red, by default.
The toolbar has two tools for manipulating the contents of the History window. Clicking on the Filter button in the History window title bar toggles the visibility of these tools. Text entered in the Filter commands here field will filter the commands appearing in the History window. By default, the filter ignores case and finds any commands containing any of the words in the filter. Clicking on the wrench on the left allows you to change this behavior. You can hide the commands that produced an error by clicking on the Filter errors button .
To enter a command from the History window, you can:
- Click once on a past command to copy it to the Command window, replacing the contents of the Command window.
- Double-click on a past command to resubmit it. Executing the command adds the command to the bottom of the History window.
Right-clicking on the History window displays a menu from which you can select various actions:
- Cut removes the selected commands from the History window and places them on the Clipboard.
- Copy copies the selected commands to the Clipboard.
- Delete removes the selected commands from the History window.
- Select all selects all the commands in the History window, including those before and after the commands currently displayed.
- Clear all clears out all the commands from the History window, including those before and after the commands currently displayed.
- Do selected submits all the selected commands and adds them to the bottom of the command history. Stata will attempt to run all the selected commands, even those containing errors, and will not stop even if a command causes an error.
- Send selected to Do-file Editor places all the selected commands into a new Do-file Editor window.
- Save all… brings up a Save review contents dialog, which allows you to save all the commands in the History window, including those before and after the commands currently displayed, in a do-file. (See [GSW] 13 Using the Do-file Editor—automating Stata for more information on do-files.)
- Save selected… brings up a Save review contents dialog, which allows you to save the selected commands in the History window in a do-file.
- Font… brings up a Font dialog, allowing you to change the font used to display the History window contents.
2. The toolbar
This is the toolbar:
![]()
The toolbar contains buttons that provide quick access to Stata’s more commonly used features. If you forget what a button does, hold the mouse pointer over the button for a moment, and a tooltip will appear with a description of that button.
Buttons that include both an icon and an arrow display a menu if you click on the arrow. Here is an overview of the toolbar buttons and their functions:
Open opens a Stata dataset. Click on the button to open a dataset with the Open dialog.
Save saves the Stata dataset currently in memory to disk.
Print displays a list of windows. Select a window name to print its contents.
Log begins a new log or closes, suspends, or resumes the current log.
Viewer opens the Viewer or brings a Viewer to the front of all other windows. Click on the button to open a new Viewer. Click on the arrow to select a Viewer to bring to the front.
Graph brings a Graph window to the front of all other windows. Click on the button to bring the Graph window to the front. Click on the arrow to select a Graph window to bring to the front.
Do-file Editor opens the Do-file Editor or brings a Do-file Editor to the front of all other windows. Click on the button to open a new Do-file Editor. Click on the arrow to select a Do-file Editor to bring to the front.
Data Editor (Edit) opens the Data Editor or brings the Data Editor to the front of the other Stata windows.
Data Editor (Browse) opens the Data Editor in browse mode.
Variables Manager opens the Variables Manager.
Show more results tells Stata to continue when it has paused in the middle of long output. Click on the arrow to choose whether to run the command to completion.
Break stops the current task in Stata.
3. Menus and dialogs
There are two ways by which you can tell Stata what you would like it to do: you can use menus and dialogs, or you can use the Command window. We will discuss the menus and dialogs here.
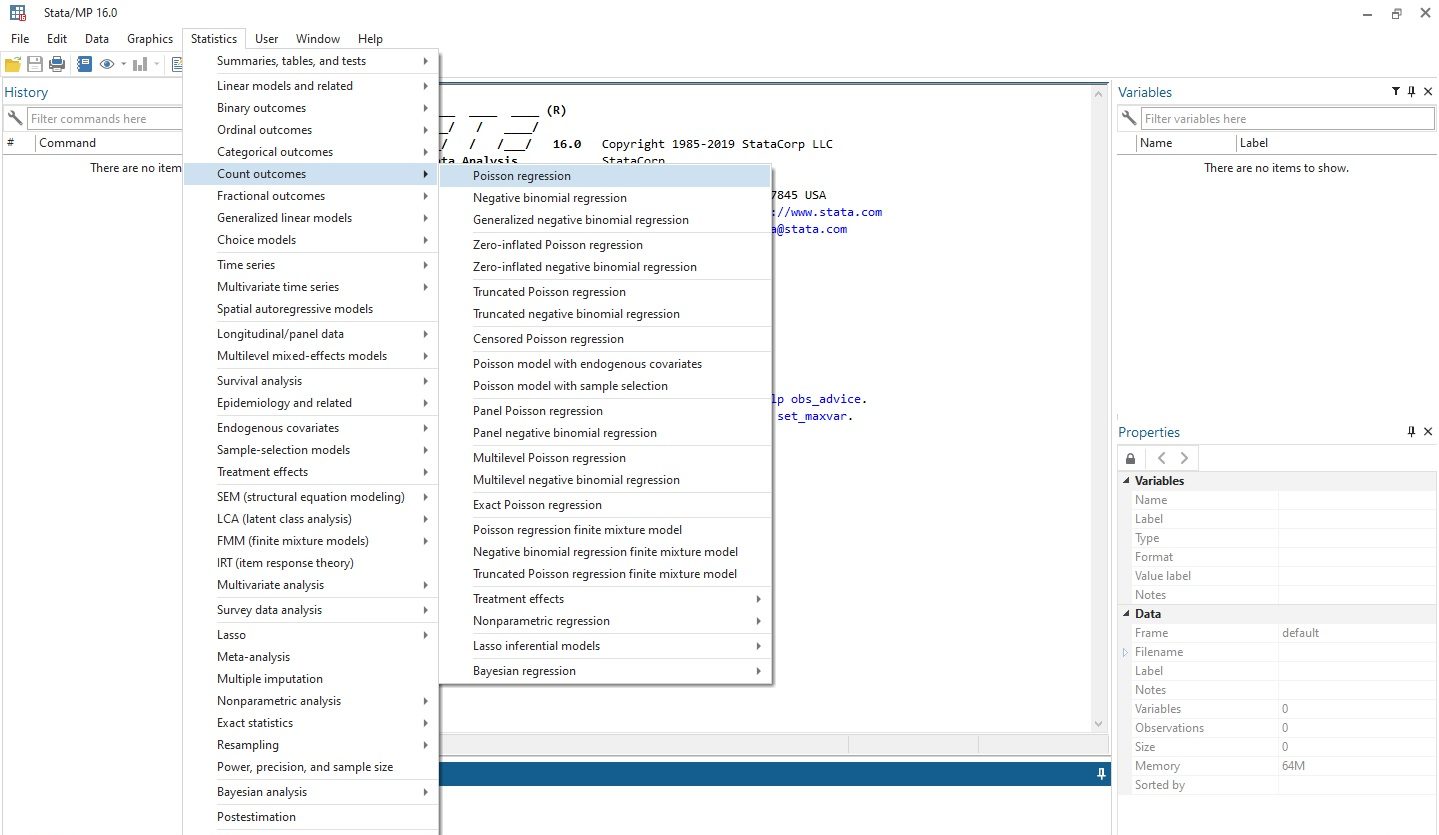
Stata’s Data, Graphics, and Statistics menus provide point-and-click access to almost every command in Stata. As you will learn, Stata is fully programmable, and Stata users can even create their own dialogs and menus. The User menu provides a place for programmers to add their own menu items. Initially, it contains only some empty submenus. As an example, suppose you wish to perform a Poisson regression. You could type Stata’s poisson command, or you could select Statistics > Count outcomes > Poisson regression, which would display this dialog:
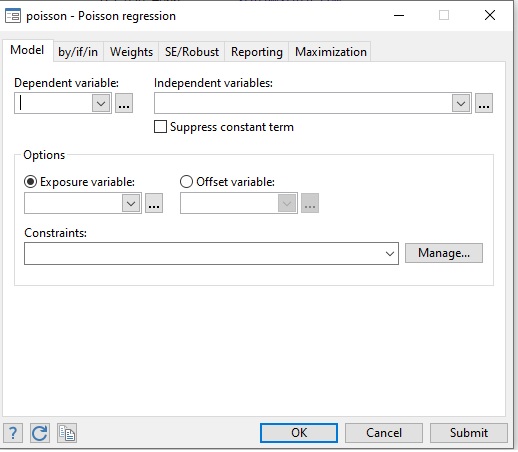
This dialog provides access to all the functionality of Stata’s poisson command. Because the dependent and independent variables must be numeric, you will find that the combo box will display only numeric variables for choosing. The poisson command has many options that can be accessed by clicking on the multiple tabs across the top of the dialog. The first time you use the dialog for a command, it is a good idea to look at the contents of each tab so that you will know all the dialog’s capabilities.
The dialogs for many commands have the by/if/in and Weights tabs. These provide access to Stata’s commands and qualifiers for controlling the estimation sample and dealing with weighted data.
The dialogs for most estimation commands have the Maximization tab for setting the maximization options. For example, you can specify the maximum number of iterations for the optimizer.
Most dialogs in Stata provide the same six buttons you see at the bottom of the poisson dialog above.
OK issues a Stata command based on how you have filled out the fields in the dialog and then closes the dialog.
Cancel closes the dialog without doing anything—just as clicking on the dialog’s close button does.
Submit issues a command just like OK but leaves the dialog on the screen so that you can make changes and issue another command. This feature is handy when, for example, you are learning a new command or putting together a complicated graph.
Help provides access to Stata’s help system. Clicking on this button will typically take you to the help file for the Stata command associated with the dialog. Clicking on it here would take you to the poisson help file. The help file will have tabs above groups of options to show which dialog tab contains which options.
Reset resets the dialog to its default state. Each time you open a dialog, it will remember how you last filled it out. If you wish to reset its fields to their default values at any time, simply click on this button.
Copy command to Clipboard behaves much like the Submit button, but rather than issuing a command, it copies the command to the Clipboard. The command can then be pasted elsewhere (such as in the Do-file Editor).
The command issued by a dialog is submitted just as if you had typed it by hand. You can see the command in the Results window and in the History window after it executes. Looking carefully at the full command will help you learn Stata’s command syntax.
In addition to being able to access the dialogs for Stata commands through Stata’s menus, you can also invoke them by using two other methods. You may know the name of a Stata command for which you want to see a dialog, but you might not remember how to navigate to that command in the menu system. Simply type db commandname to launch the dialog for commandname:
. db poisson
You will also find access to the dialog for a command in that command’s help file.
As you read this manual, we will present examples of Stata commands. You may type those examples as presented, but you should also experiment with submitting those commands by using their dialogs. Use the db command described above to quickly launch the dialog for any command that you see in this manual.
Saved as a favorite, I really like your blog!
Outstanding post, I think people should acquire a lot from this web blog its very user pleasant.
I have been checking out many of your posts and i must say pretty good stuff. I will make sure to bookmark your website.