1. The Windows Properties Sheet
When you double-click on a shortcut to start an application in Windows, you are actually executing instructions defined in the shortcut’s Properties Sheet. To open the Properties Sheet for any shortcut, right-click on the shortcut, and select Properties.
Open the Properties Sheet for Stata’s shortcut. Click on the Shortcut tab. You will see something like the following:
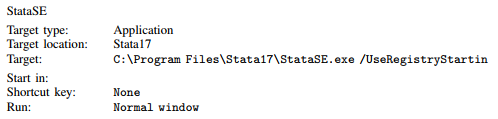
The field names may be slightly different, depending on the version of Windows that you are running. The names and locations of files may vary from this. There are two things to pay attention to: the Target and Start in fields. Target is the actual command that is executed to invoke Stata. Start in is the directory to switch to before invoking the application. You can change these fields and then click on OK to save the updated Properties Sheet.
You can have Stata start in any directory you desire. If necessary, delete the parameter /UseRegistryStartin from your Target field. Then change the Start in field of Stata’s Properties Sheet to the location you would like Stata to have as its default working directory. Of course, once Stata is running, you can change directories whenever you wish by using File > Change working directory…; see also [D] cd.
2. Making shortcuts
You can arrange to start Stata without going through the Start menu by creating a shortcut on the Desktop. The easiest way to do this is to copy the existing Stata shortcut to the Desktop. You can also create a shortcut directly from the Stata executable. Here are the details:
- Open the C:\Program Files\Stata17 folder or the folder where you installed Stata.
- In the folder, find the executable for which you want a new shortcut. The filenames for the 64-bit versions of Stata are
Stata/MP: StataMP-64.exe
Stata/SE: StataSE-64.exe
Stata/BE: Stata-64.exe
Right-click on and drag the appropriate executable onto the Desktop.
- Release the mouse button, and select Create Shortcut(s) Here from the menu that appears.
You have now created a shortcut. If you want the shortcut in a folder rather than on the Desktop, you can drag it into whatever folder appeals to you.
You set the properties for this shortcut just as you would normally. Right-click on the shortcut, and select Properties. Edit the Properties Sheet as explained above in [GSW] B.1 The Windows Properties Sheet.
3. Executing commands every time Stata is started
Stata looks for the file profile.do when it is invoked and, if it finds it, executes the commands in it. Stata looks for profile.do first in the directory where Stata is installed, then in the current directory, then along your path, then in your home directory as defined by Windows’s USERPROFILE environment variable (typically C:\Users\username), and finally along the ado-path (see [P] sysdir). We recommend that you put profile.do in your home directory.
If you create a shortcut that starts in a different directory, it will run the profile.do from that directory. This feature allows you to have different profile.do files for different projects.
Say that every time you start Stata, you would like to start a dated log for the session. In your default working directory, say, C:\Users\Stata\Documents\Stata, create the file profile.do containing this rather odd-looking command:
log using ‘: display “/.tCCCYY-NN-DD-HH-MM-SS ///
Clock(“‘c(current_date)’ ‘c(current_time),“,”DMYhms”)’, ///
name(default_log_file)
When you invoke Stata, the usual opening appears but with the following additional command, which will be executed:
running C:\Users\Stata\Documents\Stata\profile.do …
How does the command work? Let’s work from the inside out:
- c(current_date) and c(current_time) are local system macros containing the current date and current time. See [P] creturn for more information.
- The left (‘) and right (’) quotes around the local macros expand them. See [P] macro for a full explanation.
- The Clock() function uses the resulting date string and the date mask “DMYhms” to create a datetime number Stata understands. See [D] Datetime.
- The format %tCCCYY-NN-DD-HH-MM-SS formats this number in year-month-day-hour-minute- second form because this will make the files sort nicely. See [D] Datetime display formats for the details.
- The odd-looking display …’ allows the formatted date to be used directly in the command as the file name. This is the advanced concept of an in-line expansion of a macro function. You can see more in [P] macro.
- The log using command starts a log file, such as shown in [GSW] 16 Saving and printing results by using logs.
- The name option gives the log file the internal name default_log_file so that it will not likely conflict with other log files. See [R] log for details.
- Finally, the /// notations are continuation comments so that the three separate lines are interpreted as a single command. See [P] comments for more about comments.
There are many advanced Stata programming concepts in this one single command!
profile.do is treated just as any other do-file once it is executed; results are just the same as if you had started Stata and then typed run profile.do. The only special thing about profile.do is that Stata looks for it and runs it automatically.
System administrators might also find sysprofile.do useful. This file is handled in the same way as profile.do, except that Stata first looks for sysprofile.do. If that file is found, Stata will execute any commands it contains. After that, Stata will look for profile.do and, if that file is found, execute the commands in it.
One example of how sysprofile.do might be useful would be when system administrators want to change the path to one of Stata’s system directories. Here sysprofile.do could be created to contain the command
sysdir set SITE “\\Matador\StataFiles”
See [U] 16 Do-files for an explanation of do-files. They are nothing more than text files containing sequences of commands for Stata to execute.
4. Other ways to launch Stata
The first time that you start Stata for Windows, Stata registers with Windows the actions to perform when you double-click on certain types of files. You can then start a new instance of Stata by double-clicking on a Stata .dta dataset, a Stata .do do-file, or a Stata .gph graph file. In all cases, your current working directory will become the folder containing the file you have double-clicked.
Stata will behave as you would expect in each case. If you double-click on a dataset, Stata will open the dataset after Stata starts. If you double-click on a graph, the graph will be opened by Stata. If you double-click on a do-file, the do-file will be opened in the Do-file Editor.
If you would rather run a do-file directly, right-click on the do-file. You will see menu items for Execute (do) and Execute quietly (run). These items will complete the requested action in a new instance of Stata.
If you want to edit a do-file, look at a graph, or open a dataset without starting a new instance of Stata, drag the file over Stata’s main window.
5. Stata batch mode
You can run large jobs in Stata in batch mode. There are a few different ways to do this, depending on what your goals are.
Method 1
If you have a particular location where your log file should be after the job is done, this is the method you should use.
In Windows 10, type cmd in the search box in the taskbar, and press Enter.
In Windows 8, point your mouse at the hotspot in the right corner of the screen to access the Charms Sidebar, select the search charm, and start typing command in the search field. Once the list of possible applications shrinks down to just the Command Prompt app, press Enter. In older versions of Windows, click on the Start menu and choose Run…. If you are working on Windows 7 and do not see the Run… menu item, then you need to click on Start > All Programs > Accessories > Run. In the Open field, type
cmd
and press Enter.
You should now have a command prompt window open. Change the current directory to the place you would like the log file to be by using the cd command. For example, suppose your bigjob do-file is in C:\Users\someone\statastuff, and you would like to save your log in C:\Users\someone\statalogs. You would type the following to suppress all screen output and place the log file in the proper location:
cd C:\Users\someone\statalogs
“C:\Program Files\Stata17\StataSE.exe” /e do “C:\Users\someone\statastuff\bigjob”
You must specify the location of the Stata executable.
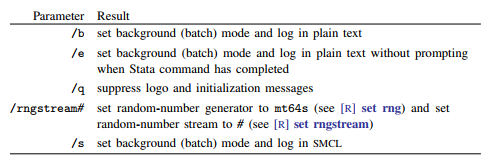
The /e parameter above tells Stata how to behave when running in batch mode. The available parameters and their purposes are
Method 2
If you would like to have a batch job that you could run at a particular time or that you could save for later use, you can use the Task Scheduler, which is part of most Windows installations.
This is a bit more advanced, and its implementation differs slightly for each kind of Windows, but here is the general gist.
In Windows 10, you can search for the Task Scheduler in the search box in the taskbar. In Windows 8, you can search for the Task Scheduler by using the search charm. In earlier versions of Windows, you can generally find the Task Scheduler by clicking Start > All Programs > Accessories > System Tools > Task Scheduler. Once you have opened the Task Scheduler, click on Create Basic Task, and follow the steps of the Basic Task Schedule Wizard to schedule a do-file to run in batch mode. You must specify the /b or /e option. In the Start in field, type the path where you would like the log file to be saved. When this file runs, all output will be suppressed and written to a log file that will be saved in the path specified.
General notes
While your do-file is executing, the Stata icon will appear on the taskbar.
If you click on the icon on the taskbar, Stata will display a box asking if you want to cancel the batch job.
Once the do-file is complete, Stata will flash the icon on the taskbar on and off. You can then click on the icon to close Stata. If you wish for Stata to automatically exit after running the batch do-file, use /e rather than /b.
You do not have to run large do-files in batch mode. Any do-file that you run in batch mode can also be run interactively. Simply start Stata, type log using filename, and type do filename. You can then watch the do-file run, or you can minimize Stata while the do-file is running.
6. Running simultaneous Stata sessions
Each time you double-click on the Stata icon or launch Stata in any other way, you invoke a new instance of Stata, so if you want to run multiple Stata sessions simultaneously, you may. The title bar of each new Stata that is invoked will reflect its instance number.
7. Changing Stata’s locale
To change the locale of Stata to English, type
set locale_ui en
To change it back to match the locale set for your operating system, type
set locale_ui default
For a complete explanation of locales and Stata, see [U] 12.4.2.4 Locales in Unicode.
8. More
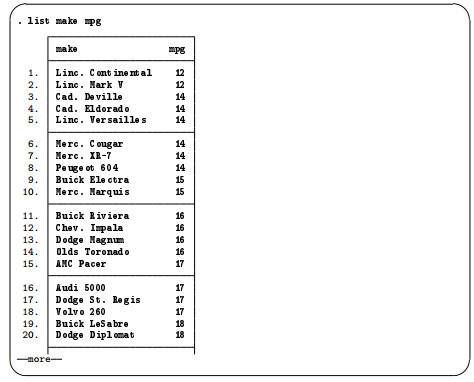
If you would like Stata to pause every time the screen fills with results, type set more on. This will cause a —more— prompt to appear at the bottom of the Results window whenever there is more information to be displayed than can fit on the screen. This happens, for example, when you are listing many observations.
If you want to see the next screen of text, you have a few options: press any key, such as the Spacebar;
click on the More button, ![]() ; or click on the —more— link at the bottom of the Results window.
; or click on the —more— link at the bottom of the Results window.
To see just the next line of text, press Enter. Pressing q will interrupt the command. If you click on the arrow of the More button, you can also select the Run to completion menu item to let the command completely finish.
9. Memory size considerations
Memory management in Stata is automatic. For details on efficiency tweaks needed by a very few Stata users, look at [D] memory.
Source: STATA (2021), Getting Started with Stata for Windows, Stata Press Publication.
28 Sep 2022
3 Oct 2022
26 Sep 2022
30 Sep 2022
26 Sep 2022
30 Sep 2022